Introduction To HTML
by Brane105

HTML:
It stands for Hyper Text Markup Language, it is mainly used to create websites and show the contents in the websites. HTML uses tags which are called as markup to display the content, these content can be a text, a table, an image, a form, heading and so on HTML as lot of predefined tags, these tags can be understood by browser
- Note: HTML is the default language the browser can understand, along with HTML browser can understand CSS & Javascript
1. Editor: Notepad or VS Code
2. Browser: To render/display HTML content.
HTML has lot of inbuilt tags, all these tags is understood by browser, some of the tags are:
html, head, title, body, h1, h2, h3, h4, h5, h6, p, table, form, div, span, input, b, i, a, img, br, hr, select, option, video, audio, canvas, article, header, footer, section, nav, aside, mark, pre, marquee, sub, sup, script, style, meta, link, ol, ul, li,
Note:
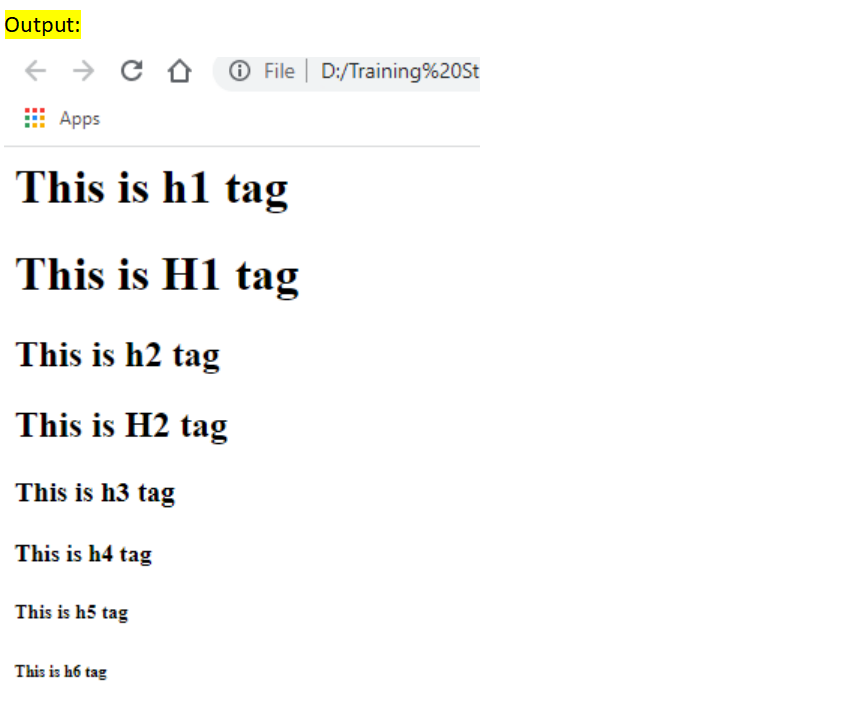
1. HTML doesn’t show any error if there’s a mistake
2. HTML is case insensitive i.e., if you have a <body> then you can close using </Body>
3. But most preferred case is lower case
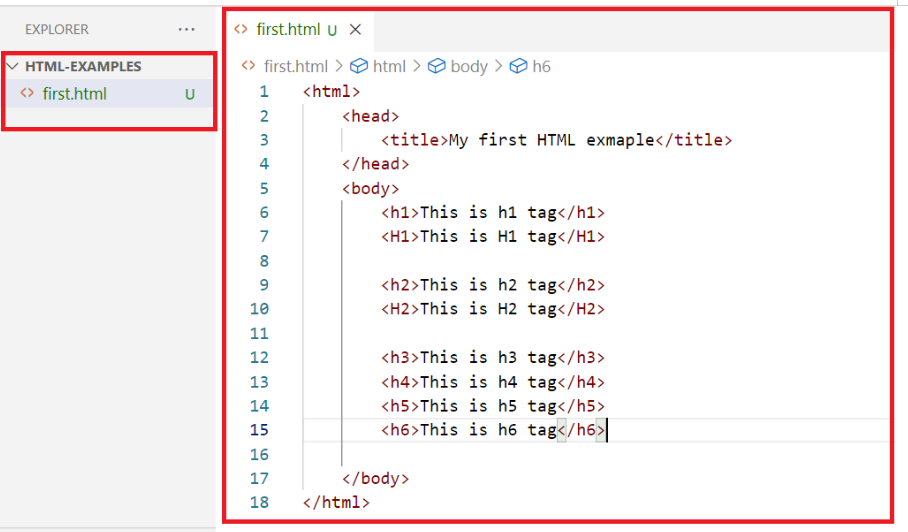
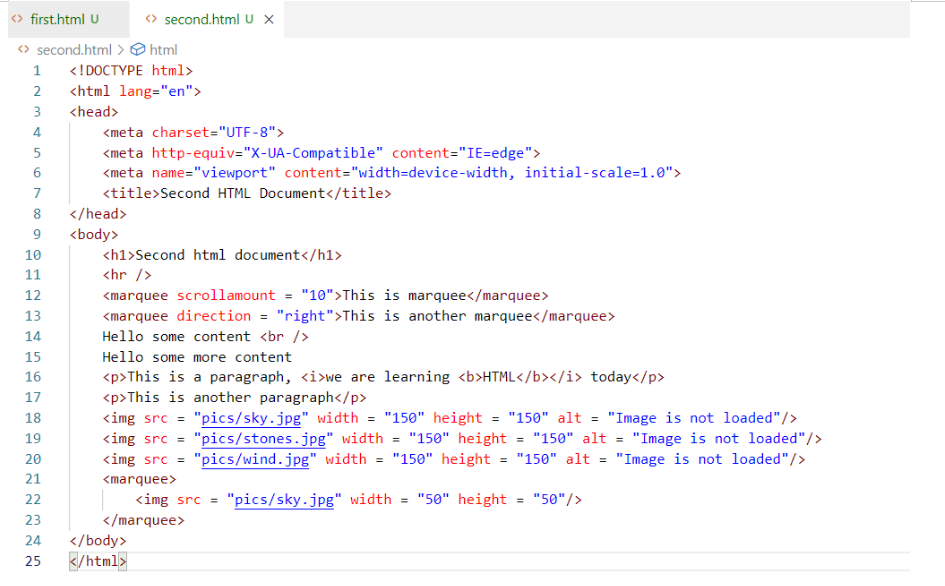
first.html
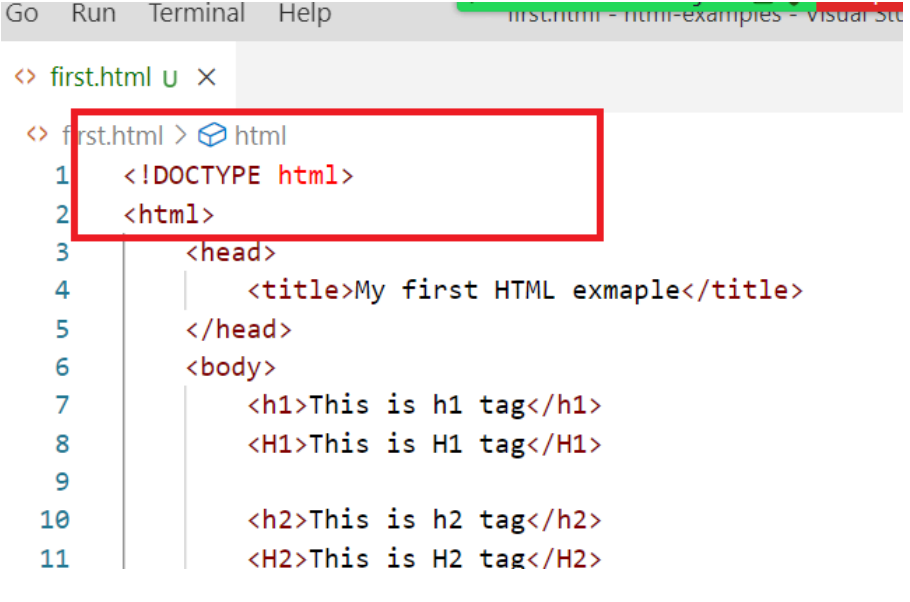
<!Doctype html> This declaration is recommended so that browser will understand immediately what document its loading.

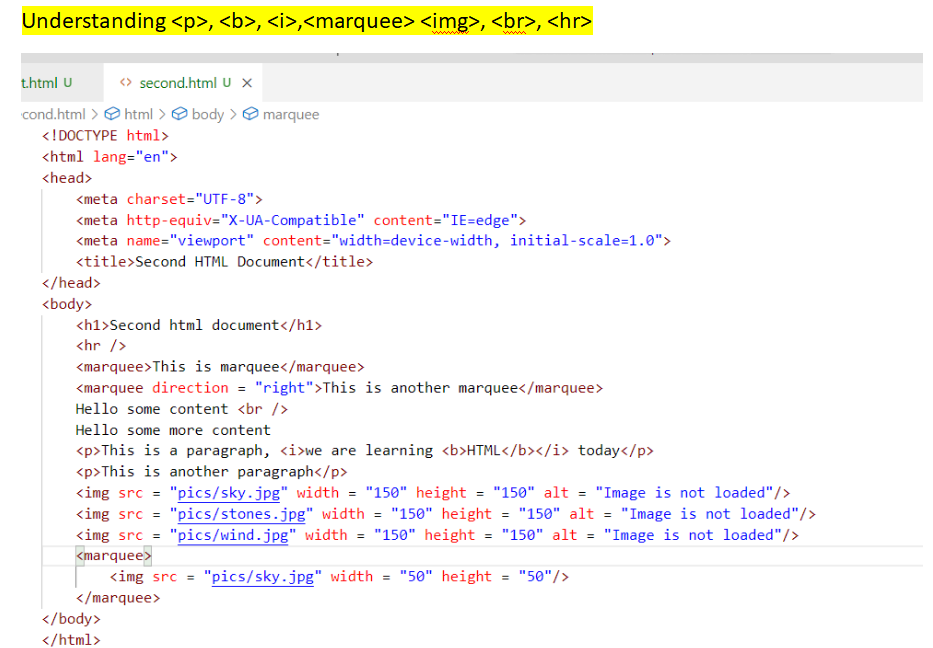
Note: There is a pics folder created in the location where we have html files
increases the speed, 10 is a number if you give greater numbers, the speed will be more
second.html
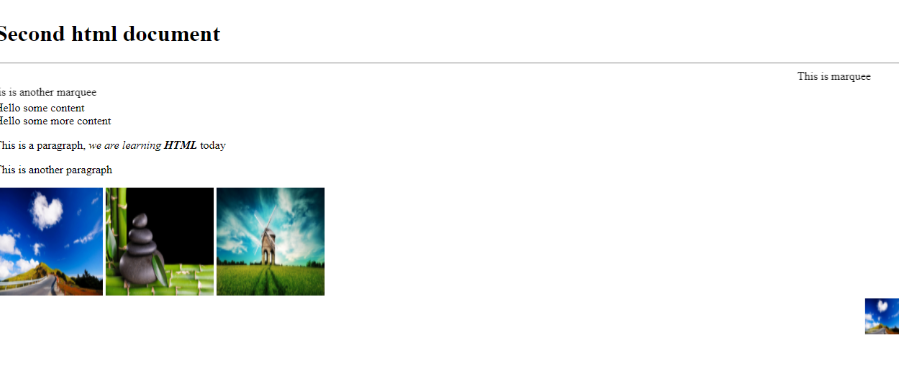
Ordering the items
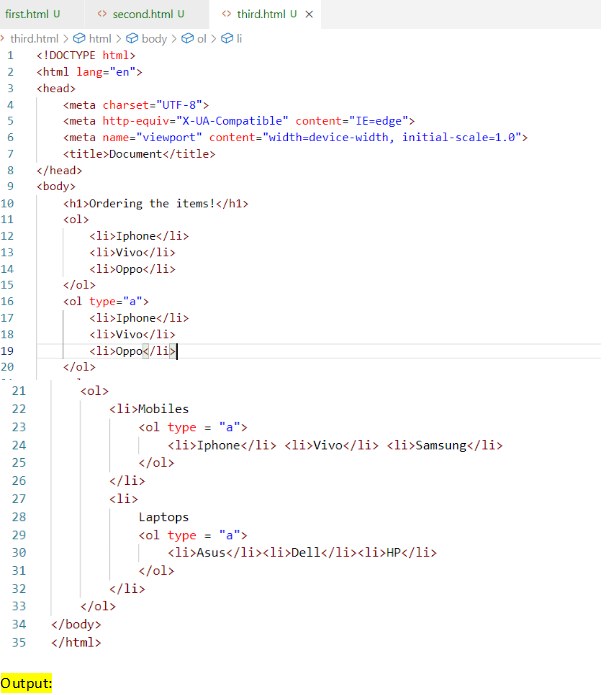
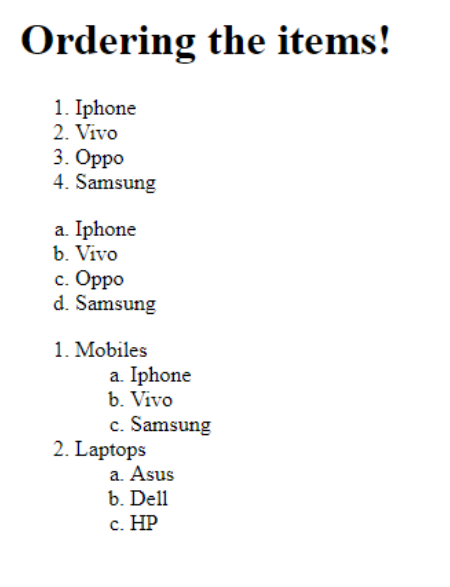
We can create list of items using <ol> and <ul> both will use <li> to list the items.
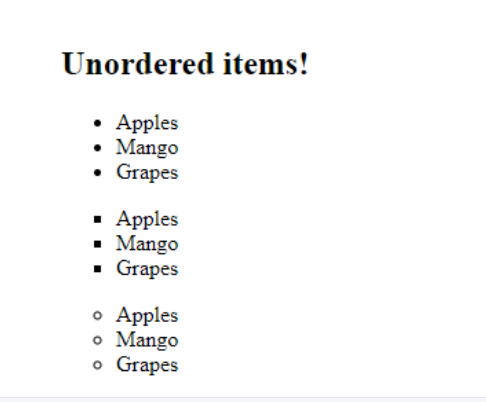
third.html
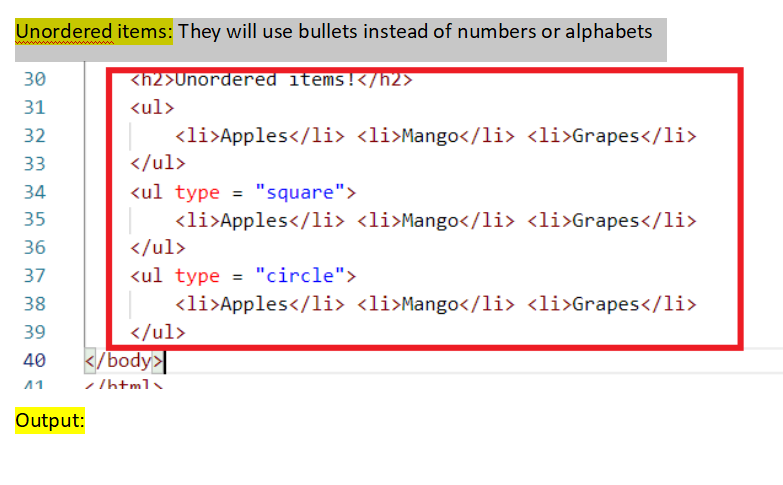
Unordered items: They will use bullets instead of numbers or alphabets
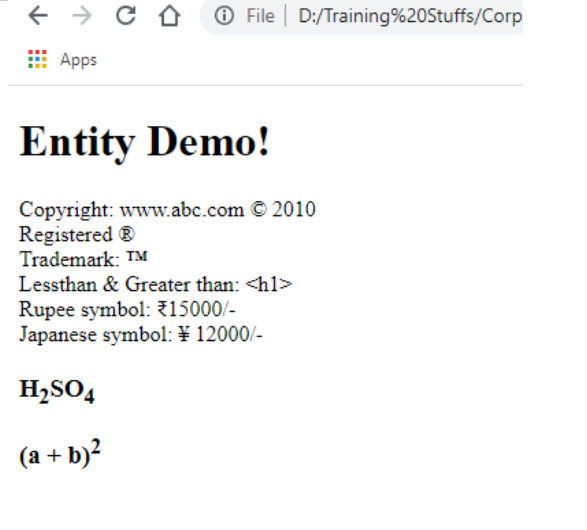
Entities in HTML These are some special characters that you want to show to the user, like registered symbol ®, copyright symbol ©, ™ trade mark, Rupee symbol, greater than, less than and so on.
To create entities you must start with &entityName; that displays the entity on the browser
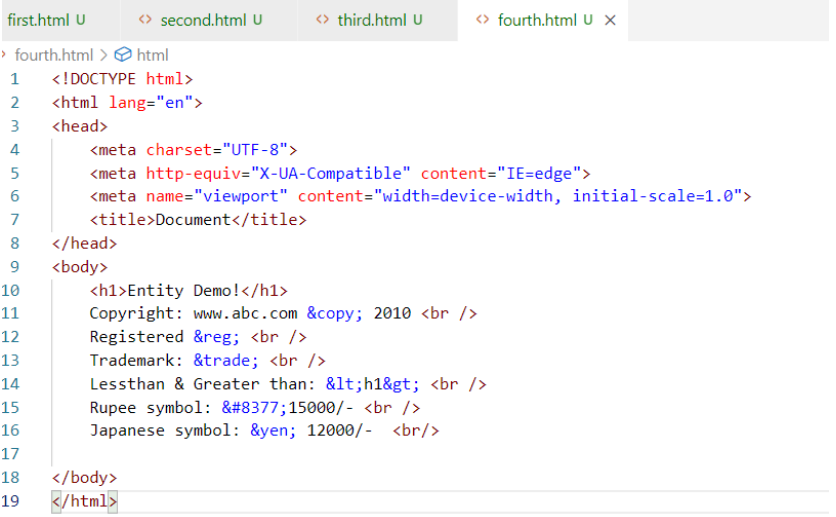
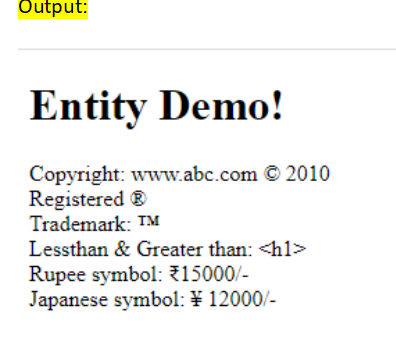
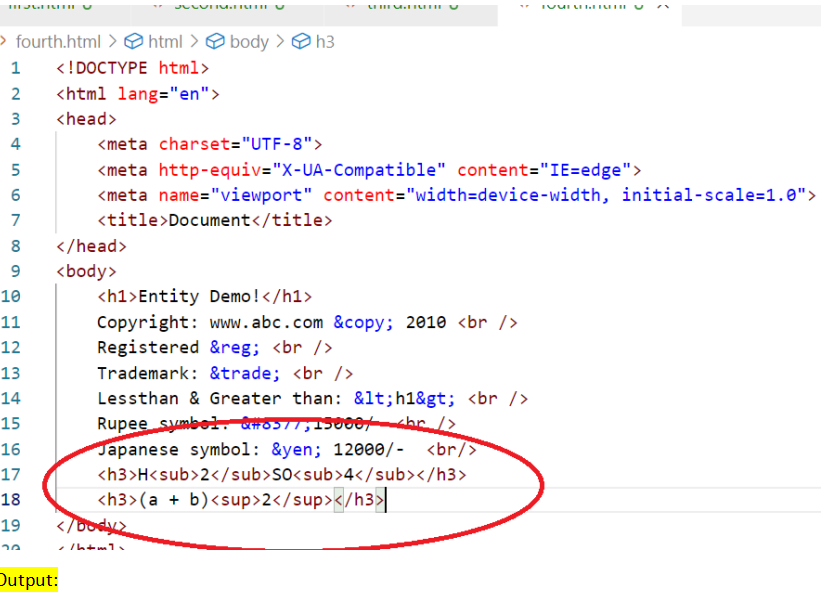
Some more entities: " For quotation & For & For a space Super script & Sub script These are used to show the content in a different position beside the normal position.
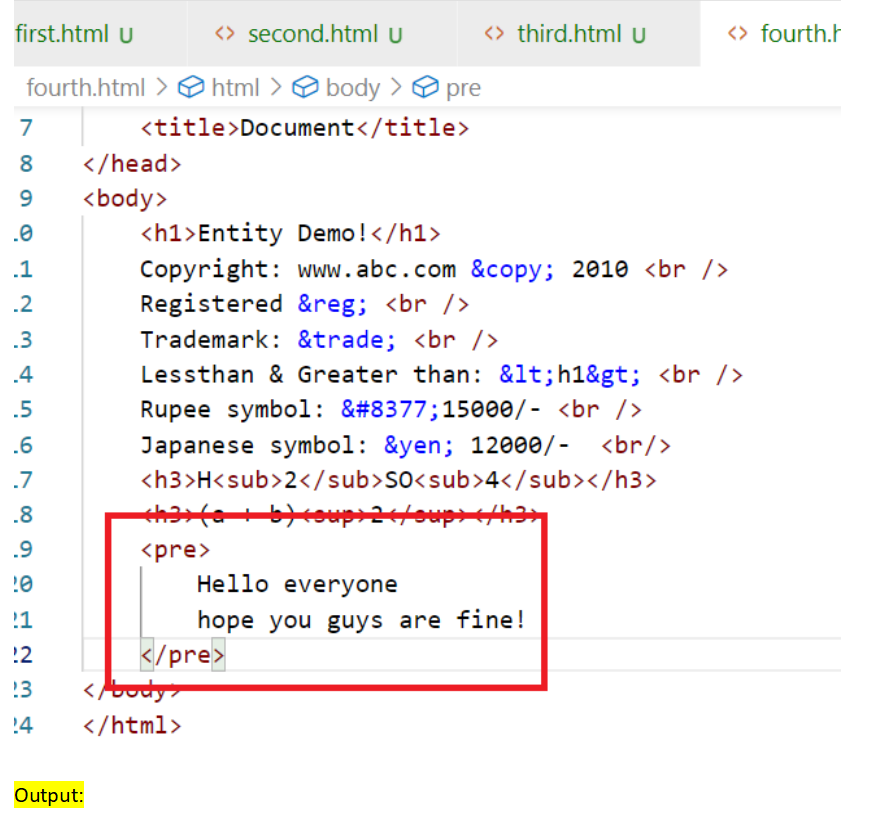
Suppose you want to show a chemical formula or mathematical formulas, these super script & subscript would be helpful.
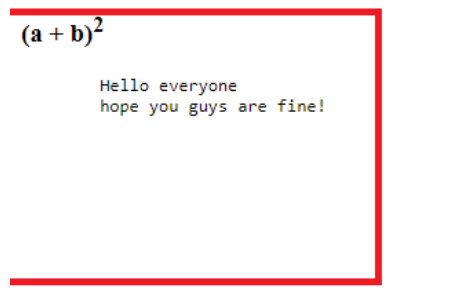
<pre>
It is used to show the contents in a way you specify in the HTML document
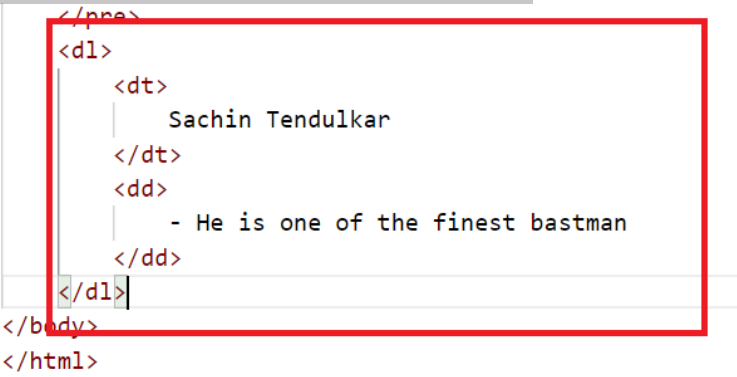
Data list It is used to create some content with some brief description
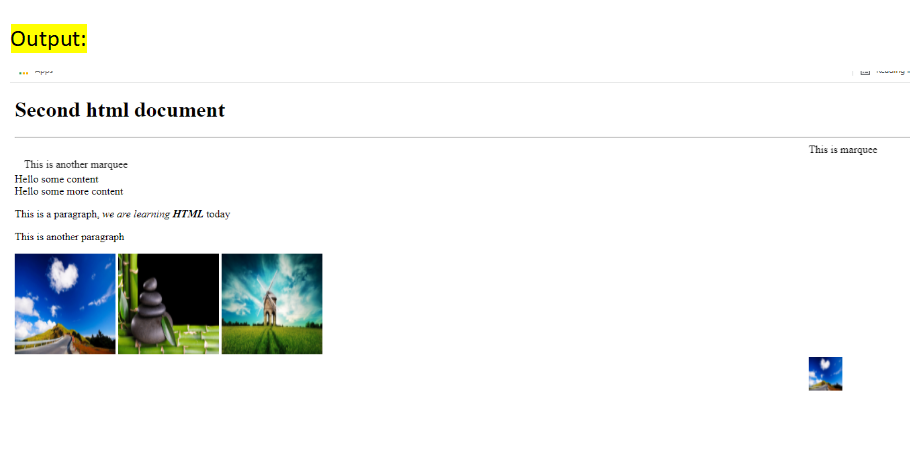
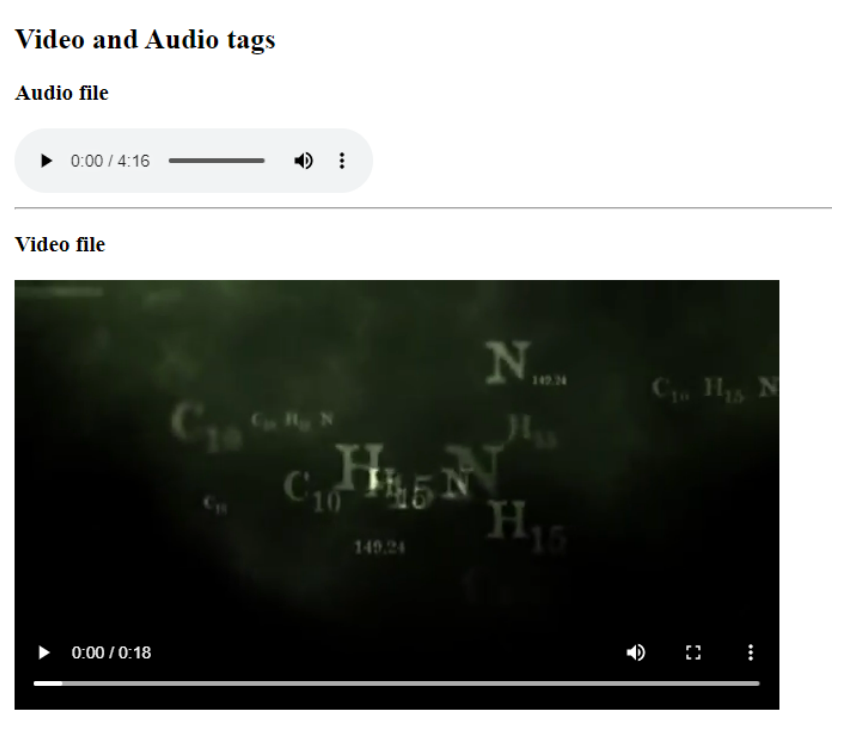
Output :
<a>anchor tag:
It is used to hyperlinks to different websites or server side resources
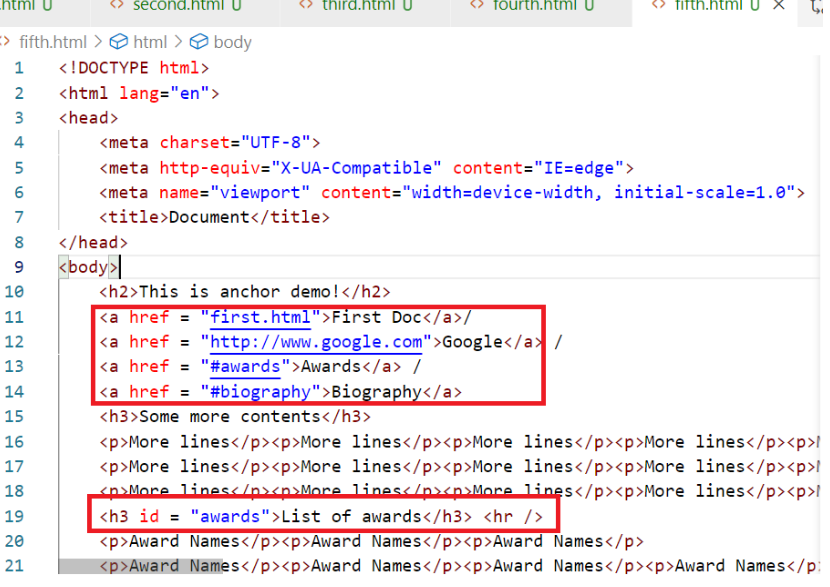
Here <a href = “#awards”> refers to the resource in the same page, the resource must have the id attribute i.e., <h3 id = “awards”> similarly you can have another <h3 id = “biography”>and refer it by <a href = “#biography”>
Video And Audio
<video> & <audio>
You can have media tags in the HTML to render video’s are audio’s
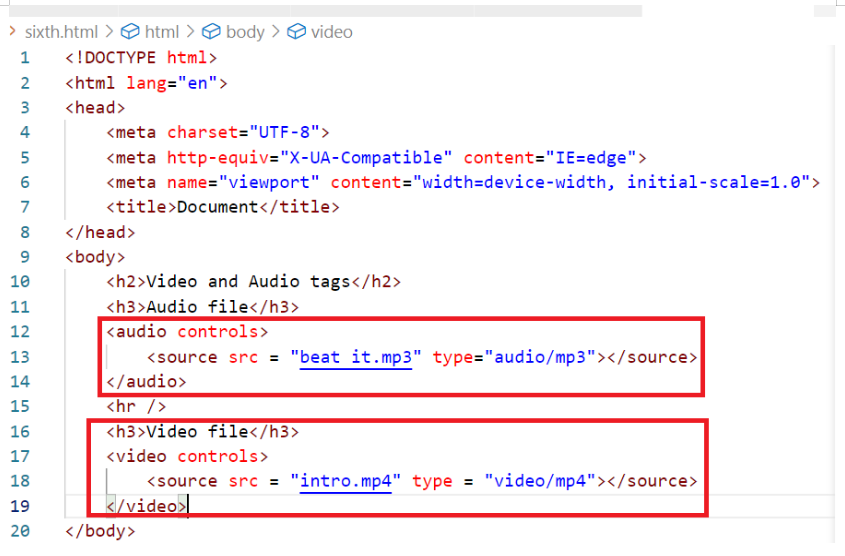
*Note: You can also add links of different videos like youtube videos
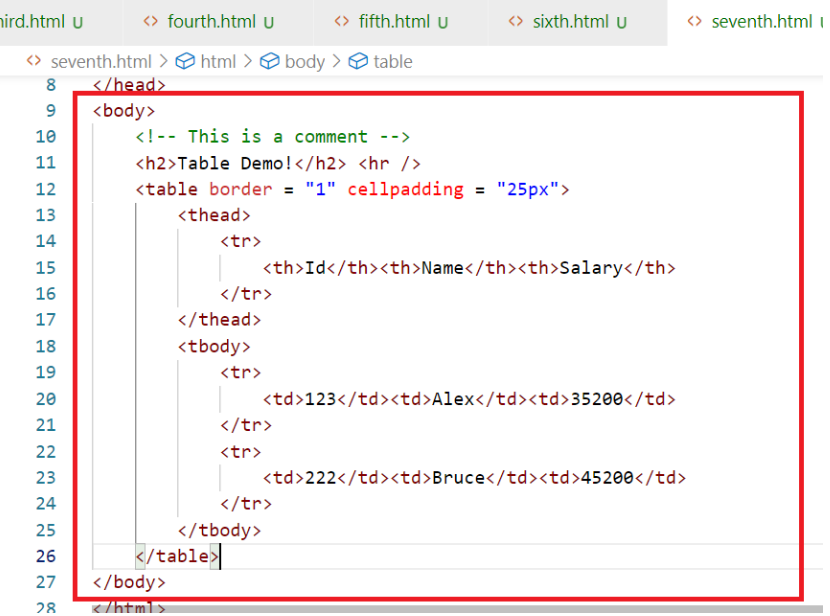
table: It allows you to create tables with rows & columns, a table must have heading which specifies how many columns it can have and body that will have content of the table.*
seventh.html
> container tags
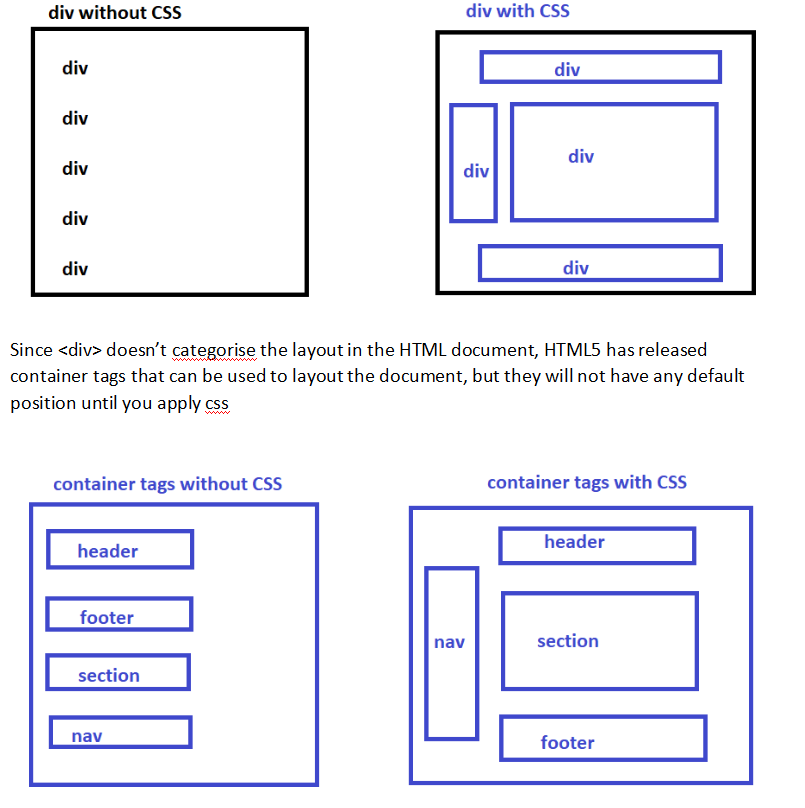
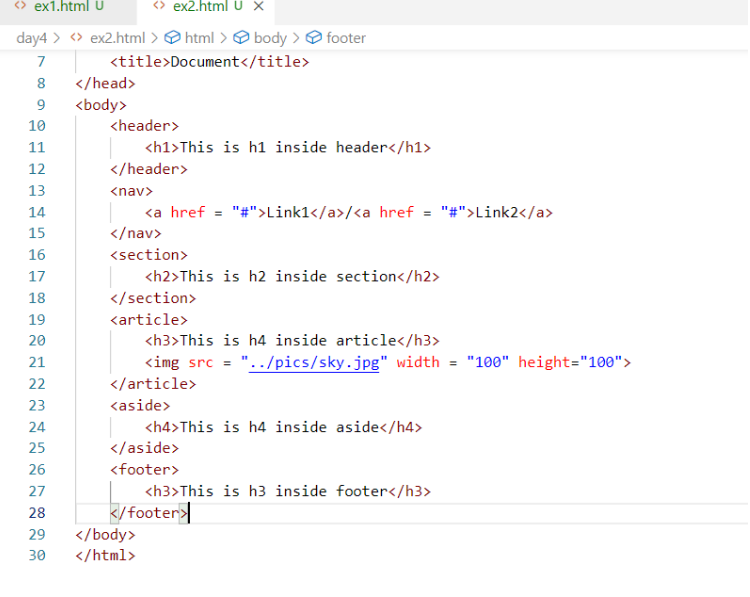
> These tags can include other html elements, by default html gives you body tags which is a container tag, along with that HTML gives you <div> tag that can include other html elements.
> Till HTML4 we had only <div> but HTML5 onwards more container tags were released which can be used to provide in a specific layout, like <header>, <footer>, <article>, <nav>, <section>, <aside>, all these have the same behaviour of <div> but they can categorise the HTML document to create a layout.
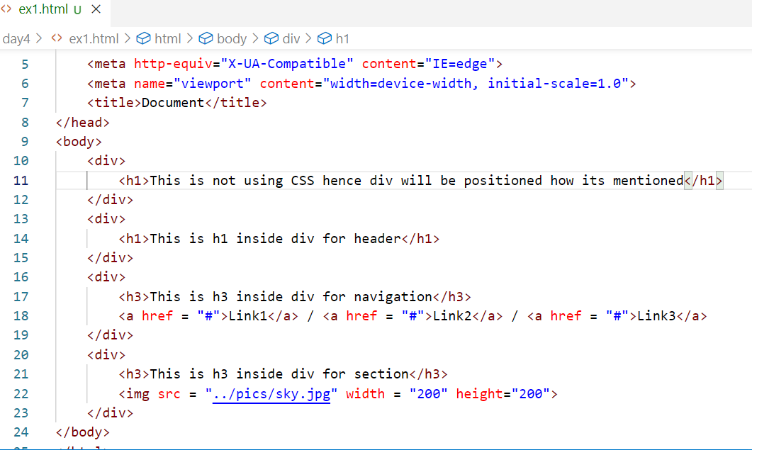
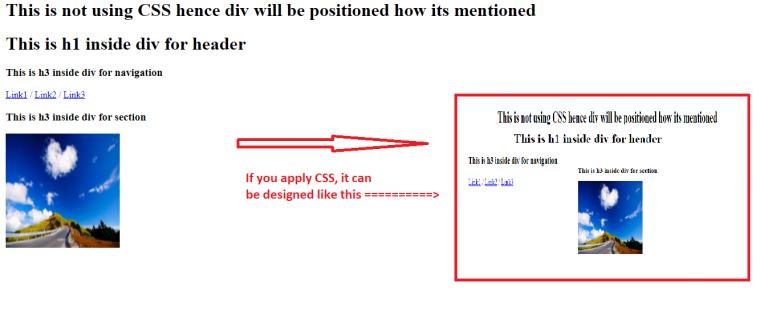
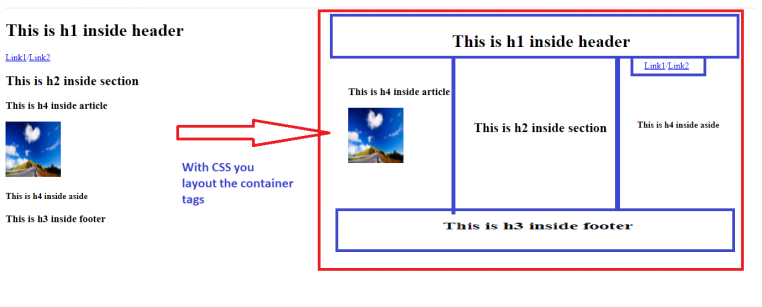
Note: These tags would create a layout only when you apply CSS, else they all would be in a default position where you keep in the HTML document.
- If you apply css to the container tags you can position it wherever you want, HTML doesn’t give any error for it, but you must follow the standard rule that header means it will be always at the top, footer means it will be always at the bottom,
- Since div was the only tag earlier we had it doesn’t give any meaning to the users/developers, but header, footer, nav, aside, article, section, gives the meaning to the developers where they should appear.
Same code can also use <header>, <footer>, <nav>, <section>, <article>, <aside> but these tags must also use CSS to form a layout so that they can be positioned at the right place.
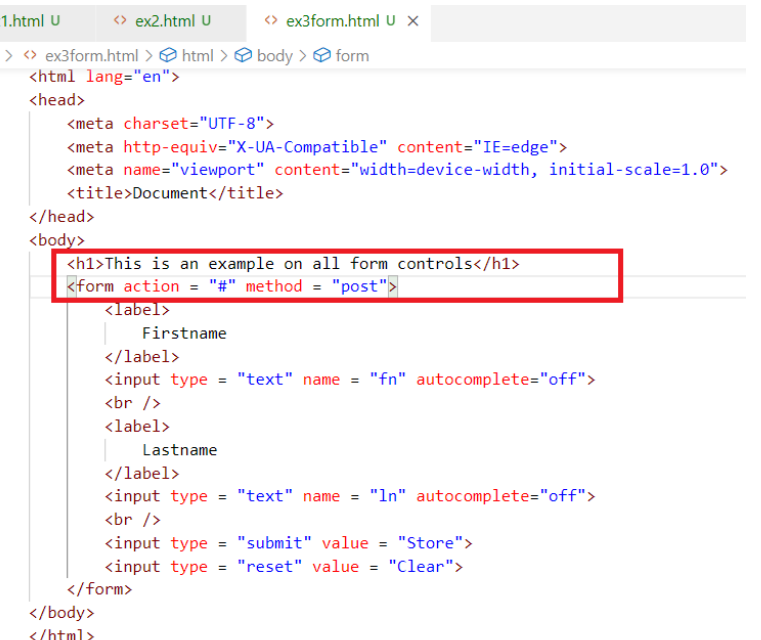
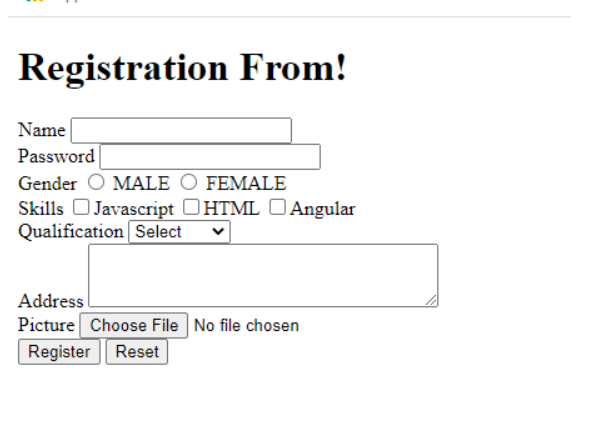
form tags
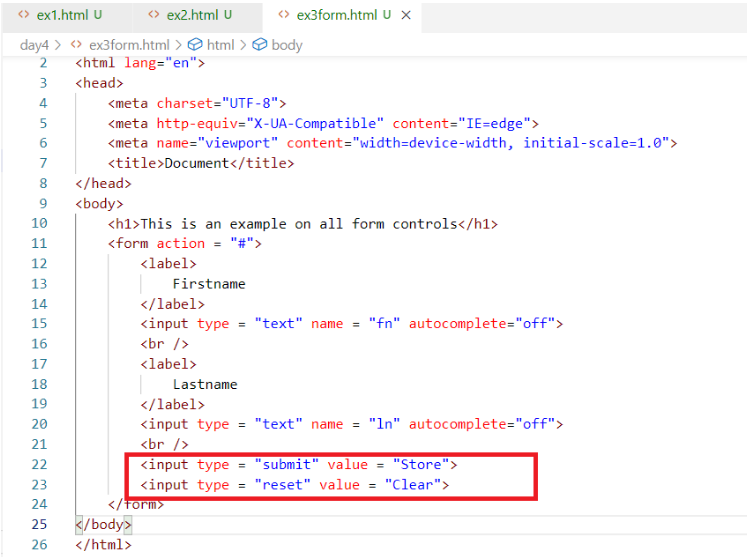
These are used to create input controls, where user can enter data, you can create input box, password box, radio button, check box, drop down, text area, file upload, buttons,
we can create buttons like submit, reset that can control the form input
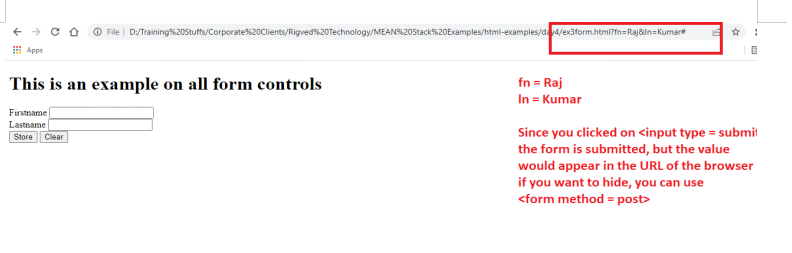
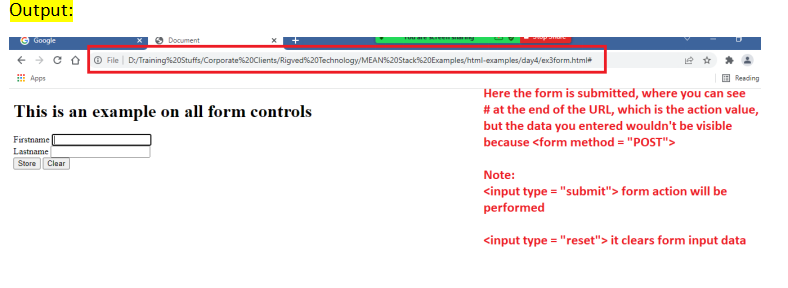
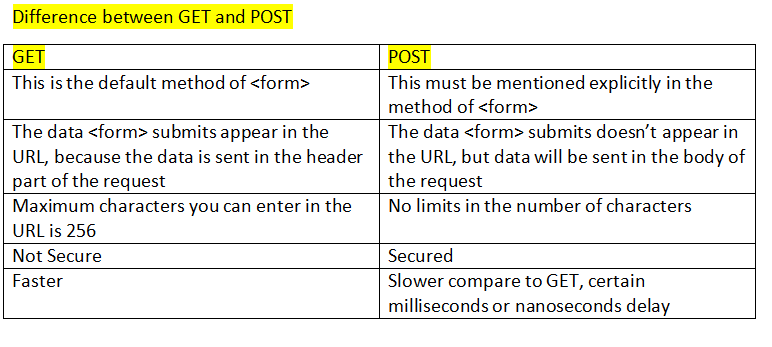
Most of the times form data must not be visible, hence you must use one attribute called method which can take values like GET & POST. GET: This is the default behaviour of the form submission, which sends the data in the url POST: This if used in the method, then the form data submitted, would be sent in the body of the document, not in the url, which wouldn’t be visible.
The input attribute type can accept lot of keywords like text, submit, reset, it can use below list of keywords:
- password
- button
- radio
- checkbox
- file
- number
- date
- range
- Note: Usually when the form submitted, a request is send to the server resource mentioned in the .
<!DOCTYPE html>
<html lang="en">
<head>
    <meta charset="UTF-8">
    <meta http-equiv="X-UA-Compatible" content="IE=edge">
    <meta name="viewport" content="width=device-width, initial-scale=1.0">
    <title>Document</title>
</head>
<body>
    <h1>Registration From!</h1>
    <form action = "#" method = "post">
        <div>
            Name <input type = "text" name = "user">
        </div>
        <div>
            Password <input type = "password" name = "pass">
        </div>
        <div>
            Gender <input type = "radio" name = "gender" value = "M"> MALE
                    <input type = "radio" name = "gender" value = "F"> FEMALE
        </div>
        <div>
            Skills <input type = "checkbox" name = "skills" value = "JS">Javascript
                    <input type = "checkbox" name = "skills" value = "HTML">HTML
                    <input type = "checkbox" name = "skills" value = "Angular">Angular
        </div>
        <div>
            Qualification
            <select name = "qualification">
                <option>Select</option>
                <optgroup label = "Graduation" >
                    <option value = "BTech">B.Tech</option>
                    <option value = "BCOM">BCom</option>
                    <option value = "BSC">BSc</option>
                    <option value = "BCA">BCA</option>
                </optgroup>
               <optgroup label = "Post Graduation">
                    <option value = "MCA">MCA</option>
                    <option value = "MBA">MBA</option>
                    <option value = "MTech">M.Tech</option>
               </optgroup>
            </select>
        </div>
        <div>
            Address <textarea name = "address" rows = "3" cols = "35"></textarea>
        </div>
        <div>
            Picture <input type = "file" name = "pic">
        </div>
        <div>
            <input type = "submit" value = "Register">
            <input type = "reset" value = "Reset">
        </div>
    </form>
</body>
</html>
Output :
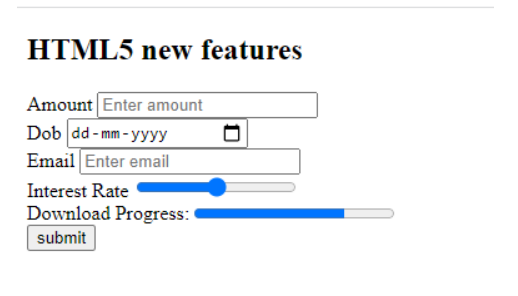
Other types of input controls: email, date, number, range, progress, placeholder - these were introduced in HTML5
<!DOCTYPE html>
<html lang="en">
<head>
    <meta charset="UTF-8">
    <meta http-equiv="X-UA-Compatible" content="IE=edge">
    <meta name="viewport" content="width=device-width, initial-scale=1.0">
    <title>Document</title>
</head>
<body>
    <h2>HTML5 new features </h2>
    <form action = "#" method = "POST">
        <div>
            Amount <input type = "number" name = "amt" placeholder="Enter amount">
        </div>
        <div>
            Dob <input type = "date" name = "dob">
        </div>
        <div>
            Email <input type = "email" name = "email" placeholder = "Enter email"
                autocomplete="off">
        </div>
        <div>
            Interest Rate <input type = "range" name = "roi">
        </div>
        <div>
            Download Progress: <progress value = "75" max = "100"></progress>
        </div>
        <div>
            <input type = "submit" value = "submit">
        </div>
    </form>
</body>
</html>
Output :
Thats all the major parts and most used HTML tags if you reading this thanks for your interest really appreciated thank you you can buy me tea : ) Buy me tea
